Christmas Pixel Light Show Starter Guide 2026
An honest first-display stack for a synchronized WS2811 pixel light show — pixels, a WLED ESP32 controller, a right-sized power supply, and a show player.
This article contains affiliate links. If you purchase through these links, we may earn a commission at no extra cost to you. Learn more.
Quick picks from this guide
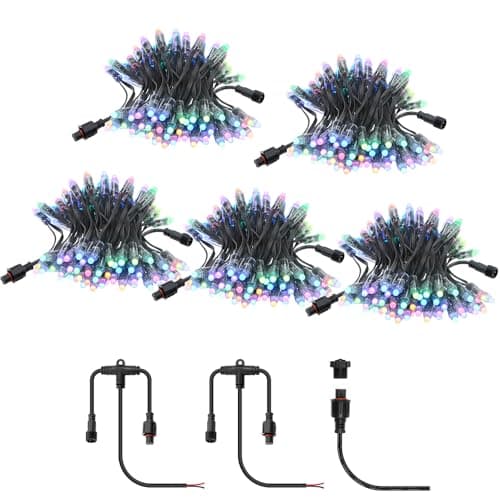
ALITOVE 500-Piece WS2811 Pixel String
The pixel string is the spine of the display and the one product here that dictates everything downstream.
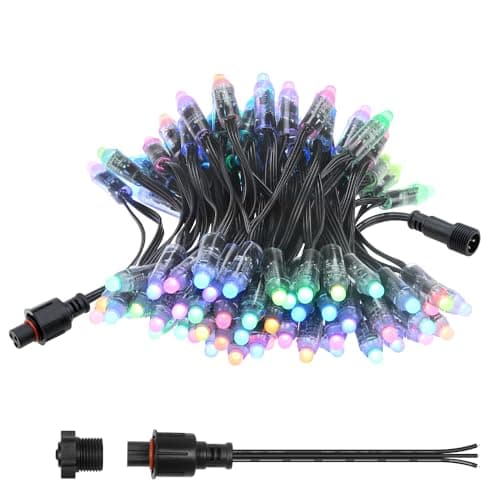
ALITOVE 100-Piece WS2811 Pixel Pack
Before committing the full string to a ladder and a roofline, a 100-pixel pack earns its place as a bench.
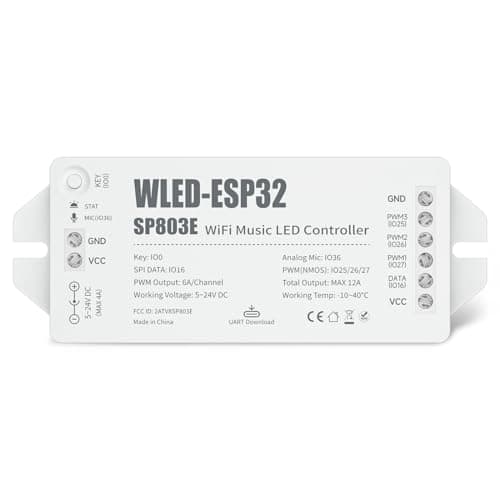
BTF-LIGHTING SP803E ESP32 Controller
The controller is where the sequence becomes light.
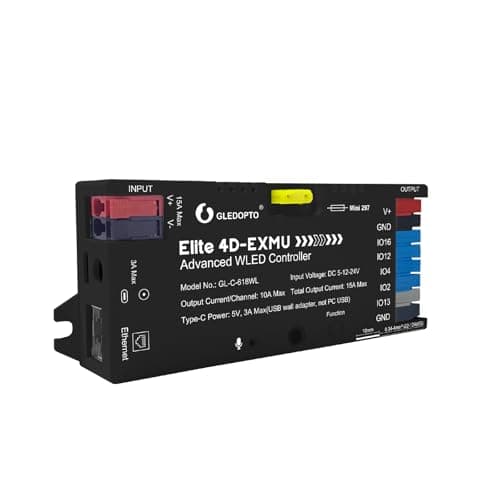
GLEDOPTO Elite 4-Channel ESP32 Controller
For a builder who already knows the display will grow, the GLEDOPTO Elite is the step up without leaving the WLED ecosystem.
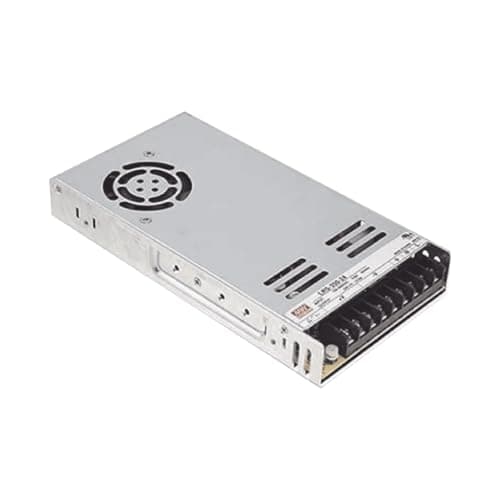
MEAN WELL LRS-350-12 Power Supply
Power is the part first-timers most often undersize, and the LRS-350-12 is chosen because it lands almost exactly on the figure the communi…
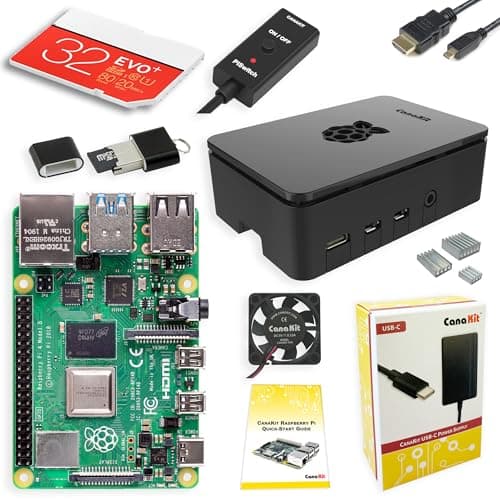
CanaKit Raspberry Pi 4 4GB Starter PRO Kit
A show meant to grow into music-synced, multi-controller territory needs a brain, and that brain is a Raspberry Pi.

| Product | Role | Price | Key Published Differentiator |
|---|---|---|---|
| ALITOVE 500pc WS2811 | Main pixel string | ~$169.00 | 500 pixels (100 × 5 strings), 12V, IP68, xConnect |
| ALITOVE 100pc WS2811 | Add-on / bench-test pack | ~$39.99 | 100 pixels, 12V, IP68 — prototype before the full run |
| BTF-LIGHTING SP803E | Budget controller | ~$21.99 | ESP32 + WLED, single output, rated to 2048 pixels |
| GLEDOPTO Elite 4-Channel | Step-up controller | ~$31.59 | 4 outputs, Ethernet + WiFi, 20A onboard fuse |
| MEAN WELL LRS-350-12 | Power supply | ~$31.98 | 12V, 29A, 348W |
| CanaKit Raspberry Pi 4 4GB | Show player | ~$149.98 | Complete Pi 4 4GB kit for FPP playback |
A synchronized pixel light show is a system, not a product. Four parts have to agree with each other before a single frame plays: addressable pixels, a controller that speaks their protocol, a power supply sized to feed them, and a player that runs the sequence. Undersize or skip any one and the display either won't light, won't sync, or browns out halfway down the roofline. That system is what separates a real sequenced show from the tap-an-app string lights covered in the best smart Christmas lights app-controlled guide — those change color from a phone, but they don't play a designed, music-timed sequence across hundreds of individually addressed nodes. A shopper who wanted plug-and-play should start there instead.
For the builder who does want the sequenced show, the winning move on a first display is to size the smallest honest version of that four-part system — enough capability to light a real run of pixels correctly, and no more. The build calendar rewards starting now: the pixel-display hobby runs a June-through-September assembly window so hardware is wired, tested, and weatherproofed well before December, and the specialized parts sell through as fall arrives. This guide assembles that first stack from six Amazon products — a 500-pixel string, an optional short bench pack, two controller tiers, a power supply, and a Raspberry Pi show player — and walks the power math a first-timer actually has to get right.
One scope note up front. Amazon covers the starter stack — pixels, controller, power, and player — but not the whole hobby. Fuse holders, power-injection wire, extra waterproof pigtails, mounting hardware, and the pro-grade controllers serious displays graduate to all live elsewhere, and this guide flags each where it comes up rather than pretending a single cart finishes the job. How many pixels and strings a given house needs is its own question of footprint; the how many Christmas lights calculator is the better tool for turning eaves and window counts into a pixel target.
The Starter Stack, Part by Part
1. ALITOVE 500-Piece WS2811 Pixel String — The Main Run
ASIN: B0923TN5GV | Price: ~$169.00 Check price

The pixel string is the spine of the display and the one product here that dictates everything downstream. It arrives as five 100-LED strings — 500 addressable nodes in total — built on F8 RGB chips at a 4-inch spacing, with each pixel independently controllable across a 24-bit palette of 16,777,216 colors. The whole run is 12V WS2811 and sealed to IP68, which is the waterproof rating a permanently-mounted outdoor run needs.
Two omissions matter: no power supply and no controller ship in the box, so the LRS-350-12 and one of the two controllers below are mandatory companions rather than optional upgrades. What it does include is exactly the injection hardware a long run wants — a female xConnect pigtail plus two T-shape power-injection connectors, enough to feed power at both the beginning and the end of the string.
The connector generation is the buyer trap to watch. Post-June-2024 ALITOVE units, including this pack, use xConnect; older or mixed stock can ship an earlier connector style that won't mate without adapters. Keep the entire run — main string, add-on strings, and pigtails — on one connector generation, and check a listing's date before buying extra strings from a different vendor or batch.
Pros:
- Five 100-LED strings joined into one continuous, individually-addressable run
- 12V WS2811 with IP68 sealing for permanent outdoor mounting
- Ships the female xConnect pigtail and two T-connectors for beginning-and-end injection
- 24-bit color and 4-inch spacing for smooth sequenced effects
Cons:
- No power supply or controller included — both are required separate buys
- xConnect only mates cleanly with other post-June-2024 xConnect hardware
- No per-pixel or total wattage published, so draw has to be planned, not read off the box
2. ALITOVE 100-Piece WS2811 Pixel Pack — Add-On / Bench-Test
ASIN: B0923SDR5T | Price: ~$39.99 Check price

Before committing the full string to a ladder and a roofline, a 100-pixel pack earns its place as a bench. It shares the same DNA as the main run — 100 F8 RGB LEDs, 4-inch spacing, IP68 sealing, 12V WS2811 — just short enough to wire up on a workbench and use to learn the system: flash WLED, confirm the data direction, practice a power-injection tap, and run a test sequence before any of it goes outside.
Because it rides the same WS2811 protocol and 12V rail as the larger pack, anything proven on the bench transfers directly to the real display. It also works as a cheap way to extend a run later — but only if the connector generation matches, so the same xConnect caution applies. This is the one genuinely optional piece in the stack: a first display can be built without it, but a first-timer learns cheaper and faster with it in hand.
Pros:
- Same WS2811 / 12V / IP68 spec as the main string, at a fraction of the length
- Ideal bench for flashing WLED and rehearsing injection before the full install
- Cheap way to extend a run later, connector generation permitting
Cons:
- Optional — a first display can be assembled without it
- Must match the xConnect generation to join the main run
- No published wattage, same as the larger pack
3. BTF-LIGHTING SP803E ESP32 Controller — Budget Controller
ASIN: B0FB38FDCS | Price: ~$21.99 Check price

The controller is where the sequence becomes light. The SP803E is the budget entry: an ESP32 board that runs WLED, the open-source firmware the whole hobby standardizes on. The WLED project's own tagline is "Control WS2812B and many more types of digital RGB LEDs with an ESP32 over WiFi!" — and that WiFi-first design is why this board is configured through the WLED web UI or app over 2.4GHz WiFi rather than any proprietary cloud.
Its published ceiling is 2048 pixels of RGB or RGBW, roughly four times a first run of this size — ample headroom for a single-output display. It takes DC 5V, 12V, or 24V input (12V here, matching the pixels and the supply), drives WS2811, WS2812, WS2815, and SK6812 chips, and adds a built-in microphone for sound-reactive effects plus a Type-C UART port for flashing. Reverse-polarity, backfeed, and data-surge protection are built in — worthwhile insurance on a first wiring job. As with the pixels, the power supply is not included.
Pros:
- Runs WLED over WiFi, with published support for up to 2048 pixels
- 12V input matches the pixels and the LRS-350-12 supply
- Built-in mic for sound-reactive modes; Type-C UART for flashing
- Reverse-polarity, backfeed, and data-surge protection onboard
Cons:
- Single output — one data line, so no native multi-zone splitting
- No onboard fuse published; fusing is left to the builder
- Power supply not included
4. GLEDOPTO Elite 4-Channel ESP32 Controller — Step-Up Controller
ASIN: B0FZ7WCYCK | Price: ~$31.59 Check price
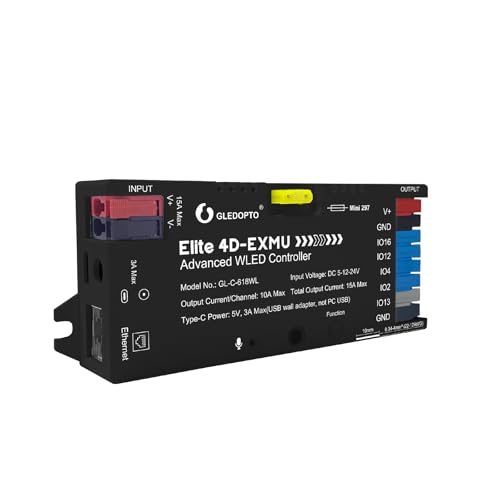
For a builder who already knows the display will grow, the GLEDOPTO Elite is the step up without leaving the WLED ecosystem. It also runs WLED, but adds four independent outputs, so a run can be split into separately-addressed zones or fed from multiple data lines off one board. It carries both Ethernet and WiFi — a wired drop is far more dependable outdoors than WiFi alone once several controllers are in play — plus an energy-saving relay and a built-in mic.
The differentiator worth the small premium is the 20A pluggable fuse onboard, which puts a real overcurrent device between the supply and the pixels — something the SP803E leaves to external hardware. It accepts DC 5–24V and supports WS2811, WS2812, SK6812, and WS2815 with WLED segment control. It belongs here as the four-output, Ethernet-capable, fused option, not a higher-throughput one — its maximum pixel count isn't published, so this guide won't race it against the SP803E's stated ceiling.
Pros:
- Four independent outputs for multi-zone or multi-line wiring
- Ethernet and WiFi — wired networking is more reliable outdoors
- 20A pluggable fuse onboard, plus an energy-saving relay
- Runs WLED with segment control; DC 5–24V input
Cons:
- Costs more than the single-output SP803E
- Maximum pixel count isn't published, so it can't be compared on raw capacity
- Power supply still separate
5. MEAN WELL LRS-350-12 Power Supply — The 12V Supply
ASIN: B07WHJF1Q8 | Price: ~$31.98 Check price

Power is the part first-timers most often undersize, and the LRS-350-12 is chosen because it lands almost exactly on the figure the community recommends for a run this size. It is a 12V supply rated at 29A and 348W, UL and CE listed, with a switchable 90–132/180–264VAC input (default 115VAC for US outlets) and a fan that switches on at 50°C. Short-circuit, overload, overvoltage, and over-temperature protection are all built in — the reasons the power math below leans on this specific unit.
Two honest disclosures come with it. It is listed by a third-party seller — "power supply mall," not Amazon or MEAN WELL directly — and its stock reads as scarce; if it's unavailable, an equivalent MEAN WELL LRS-350-12 from another seller is the identical unit. And as a supply well over 100W, it sits past the threshold where fusing stops being optional — the power/timer safety planning guide covers the timer and safety side a permanent outdoor supply needs.
Pros:
- 12V / 29A / 348W — matches the community's recommended class for this pixel count
- UL and CE listed, with switchable AC input for US outlets
- Short-circuit, overload, overvoltage, and over-temperature protection
- Fan-cooled, with the fan engaging at 50°C
Cons:
- Sold by a third-party seller and stock can be thin — an equivalent LRS-350-12 is the same unit
- Over the 100W line where fuses become mandatory, which is added hardware
- Enclosure and line-voltage wiring are on the builder — not plug-and-play
6. CanaKit Raspberry Pi 4 4GB Starter PRO Kit — Show Player
ASIN: B07V5JTMV9 | Price: ~$149.98 Check price

A show meant to grow into music-synced, multi-controller territory needs a brain, and that brain is a Raspberry Pi. This CanaKit kit is a complete Pi 4 Model B with 4GB of RAM and a 1.5GHz 64-bit quad-core processor, bundled with a preloaded 32GB EVO+ microSD card, a case with fan, a 3.5A USB-C power supply, heat sinks, a 6ft display cable, and a PiSwitch. It's a turnkey computer rather than a bare board — what a first-timer wants when the goal is running show software, not sourcing accessories.
The Pi's job in this stack is to run FPP, the free Falcon Player show software, which plays a designed sequence out to the WLED controllers over the network. A 4GB Pi 4 is comfortably enough for a first display, and the fan and heat sinks help it hold sustained playback through cold December nights. Whether to run a Pi at all — versus letting a single controller handle everything — is the subject of the framework below.
Pros:
- Complete Pi 4 4GB kit — board, case, fan, PSU, and 32GB microSD all included
- Runs FPP (Falcon Player) for sequenced, multi-controller playback
- Turnkey — no separate sourcing of card, case, or power
- Fan and heat sinks for sustained playback
Cons:
- The second-priciest part of the stack, behind only the 500-pixel string
- Overkill if the plan is one WLED controller and nothing more
- Not required until the display grows past a single controller's effects
The Power Math for a First Pixel Run
The single calculation that keeps a first display from browning out — or from cooking a supply — starts with a sourced per-pixel figure rather than a guess. QuinLED's 12V pixel guide advises, "Dig-Quad I advise a 350w / 29Amps power supply for up to 1000 pixels," and notes the figure "assumes real-world normal colors and effects, not 100% RGB white." Working backward from that gives a real-world planning budget:
- 350 W ÷ 1,000 pixels = 0.35 W per pixel (real-world usage)
- 0.35 W ÷ 12 V = ~0.029 A, or ~29 mA per pixel at 12V
Apply that per-pixel figure to the starter run of 500 pixels:
- 500 pixels × 0.35 W = 175 W planned draw
- 175 W ÷ 12 V = ~14.6 A
Set against the LRS-350-12's 348W / 29A rating:
- 175 W ÷ 348 W = ~50% of the supply's wattage
- 14.6 A ÷ 29 A = ~50% of the supply's amperage
- QuinLED rates this same 350W/29A class for up to 1,000 pixels, so the starter run sits at half that pixel ceiling
That is deliberate headroom, not waste.
The honest caveat is baked into QuinLED's own wording: the figure "assumes real-world normal colors and effects, not 100% RGB white." A sustained all-white pattern draws materially more than the 0.35 W-per-pixel planning number, so a first-timer running a full-white "smoke test" across every node pushes the supply far harder than any normal sequence will. Two guardrails come from the roster itself: the LRS-350-12's fan kicks in at 50°C and the unit carries over-temperature protection, so watch its temperature during white tests; and don't treat the "up to 1,000 pixels" ceiling as valid at full white. Keep the display near the real-world half of the budget, and full white stays a brief diagnostic rather than an operating mode.
Distance is the other half of the power problem. With 12V pixels, QuinLED's guide notes you "can run about 15m/50ft of pure cable before the voltage drops too low and you are going to need to add extra power injection wires immediately!" Past that point, the fix is power injection — and the WLED documentation defines it plainly: "Power injection is where you connect multiple wires from your power supply to the strip in multiple places, usually once at the beginning and once at the end." The ALITOVE pack's female pigtail and two T-connectors are exactly that beginning-and-end hardware.
Two rules keep injection honest. Hold any injection wire under QuinLED's voltage-drop budget — "A power injection wire should not have more then 10% voltage drop for the current we are calculating with" — and never go thinner than the WLED floor: "As a rough guide, you should never use anything thinner than 22AWG wire for power injection." Because the supply here is well over 100W, fuse it too: the WLED docs advise to "Buy a fuse that's rated just over what you expect your LED strip to draw. For example, if you calculate that your LEDs will draw at most 4.5A, buy a 5A fuse," placed as close to the supply as possible on the positive lead. Fuse holders, the fuses themselves, and injection wire are among the parts the Amazon starter stack does not include.
WLED, xLights, and When a Dedicated Controller Makes Sense
Two forks decide how far this stack can scale, and both are worth understanding before the first controller is even flashed.
WLED on its own is genuinely capable. For effects, color, and segment control on a single controller it needs no PC and no Pi — the board plays patterns directly, which is why a very first display can run on nothing but the SP803E and a phone. What WLED does not do is design and play a timed, multi-controller sequence synced to music. That job belongs to two other free tools. xLights is the sequencer; per its own site, a "free and open source program that enables you to design, create and play amazing lighting displays through the use of DMX controllers, E1.31 Ethernet controllers and more." It runs on Windows, macOS, and Linux and ships new YYYY.NN-numbered releases every few weeks, so it's worth updating each season rather than pinning to one build. FPP — the Falcon Player — is the playback half: free show-player software that runs on the Raspberry Pi and pushes sequences out to the WLED controllers. That division of labor is precisely why the Pi kit is here — WLED lights the pixels, xLights designs the sequence, and FPP on the Pi plays it back across every controller in time.
FPP is no fringe project, either. Its forum counts more than 17,000 members and over 137,000 posts, so a first-timer's questions have almost always already been answered by someone building the same kind of show.
The second fork is when to leave WLED-on-ESP32 for a dedicated controller. Boards like the SP803E and GLEDOPTO are ideal for a first display and for years of growth beyond it. Larger, more demanding shows eventually move to purpose-built hardware such as the Falcon F16V5 and F16V4, or Kulp controllers — gear that isn't sold on Amazon and isn't part of this affiliate stack. Falcon controllers sell direct through pixelcontroller.com, where the F16V5 runs $280 and the F16V4 $255, with ready-to-run variants above those; Kulp is another off-Amazon option in the same serious tier. None of that is a first-display purchase. It's named here only so the upgrade path is honest — not to send anyone shopping before they've lit their first run. And if the display does keep growing until neighbors start asking what you'd charge to do theirs, our Christmas light installation business starter gear guide covers the ladder, safety, and commercial-grade equipment that turns the hobby into paid work.
Last updated: July 2026. Prices may vary on Amazon — check current pricing via the links above.
Frequently Asked Questions
Do I need a Raspberry Pi, or can WLED run the whole show?
WLED alone can run a single controller's effects and color with nothing but a phone, so a first, single-controller display needs no Pi at all. The Pi, running FPP, earns its place the moment you want a sequence synced to music across more than one controller, because that coordinated playback is the one piece WLED does not handle on its own. Buying the kit up front means the stack scales without re-planning; skipping it is a fair way to start smaller and add it the following season.
How many pixels can the SP803E drive?
Its published ceiling is 2048 pixels of RGB or RGBW, roughly four times a typical first run. That figure is the data-addressing limit, though, not a power limit. Long before you reach 2048 pixels you'll be sizing a bigger supply and adding injection, so in practice the controller's ceiling is rarely what stops a growing display first — power and wiring hit their limits sooner.
What size power supply does a 500-pixel run need?
Planning at the community's real-world figure of about 0.35 watt per pixel, that run works out to roughly 175 watts, and the 348-watt LRS-350-12 covers it at about half its rated capacity — the same supply class QuinLED recommends for up to 1,000 pixels. The caveat is full white: a sustained all-white pattern draws materially more than the planning figure, so treat white as a short diagnostic and size for real-world sequences rather than the worst case.
Is xLights free, and what does it run on?
Yes — xLights is free and open-source, and it runs on Windows, macOS, and Linux, so it doesn't lock you to one operating system. It handles sequence design only; it doesn't replace the controller firmware (WLED) or the show player (FPP), which is why the three tools are used together rather than one instead of another. New versions land every few weeks, so it's worth updating each season instead of settling on an old build.
What is xConnect, and will my pixels plug together?
xConnect is the waterproof connector standard on current ALITOVE pixel strings, including this pack, which ships post-June-2024 connectors. Pixels and pigtails only mate cleanly when they share that generation — older or mixed stock can carry an earlier style that needs adapters. The practical rule is to keep an entire run on one connector generation and to check a listing's date before adding strings from a different batch or brand.
Can a first display start smaller?
Yes, and the 100-pixel pack is built for exactly that. It shares the same WS2811 protocol, 12-volt rail, and IP68 sealing as the main string, so it works as a bench to flash WLED, confirm data direction, and practice an injection tap before anything goes on a ladder. Learning the wiring on a short, low-current run also means an early mistake costs a connector, not the whole display.
Get our Christmas gear picks
Holiday deal roundups and updates when our top picks change.
No spam, ever. Unsubscribe anytime.
Sources & Methodology
Methodology: ChristmasGearHQ guides are researched on an expert-verification model. Specifications, dimensions and capability claims are taken from the manufacturer's own published material and, where available, independent published reviews, and are attributed in the text to the source that published them. Where two sources disagree, we say so and name both rather than picking one. We do not make first-person hands-on testing claims.
Prices, sellers and availability are read from the live product page and move on their own schedule — confirm the current figure through the links above before buying. Edited by Nicholas Miles, Chief Editor. Corrections: contact us.
More Guides
- Christmas LightsBest Giant Lighted Outdoor Christmas Trees 2026: 6 to 20 Foot Cone, Flagpole, Spiral and 3D Picks
- Christmas LightsJellyfish vs Trimlight vs Gemstone - What Permanent Christmas Lights Cost in 2026
- Christmas LightsBest Smart Outdoor Plugs & Timer Zone Kits for Christmas Lights 2026
- Christmas LightsChristmas Light Power, Mounting & Cable Accessories 2026